How to Calibrate Your Thermometer
Crafting the perfect confection is as much a science as it is an art. Achieving the ideal texture, taste, and consistency often hinges on hitting the exact temperature. Whether you're making smooth caramels, crisp brittles, or fluffy marshmallows, precise temperature control is non-negotiable. That’s where your trusty thermometer comes into play—but only if it's accurate.
What is Calibration?
Calibration is the process of testing and adjusting a tool or instrument to ensure its measurements are accurate. For thermometers, this involves verifying that the temperature readings match a known standard, such as the boiling point or freezing point of water. Regular calibration ensures your thermometer remains reliable, giving you confidence in your cooking process and final product.
Why Calibration Matters
Thermometers can drift out of accuracy over time due to regular wear and tear, exposure to high heat, or even manufacturing variances. An inaccurate thermometer can mean the difference between achieving the perfect crack stage for brittle or ending up with an unintentional sticky mess. Calibration ensures that your thermometer gives you reliable readings every time, so your hard work doesn't go to waste.
Imagine this: you’re making toffee and need to hit 300°F for that beautiful golden crunch. If your thermometer is off by just 5 degrees, your candy might undercook, leaving it chewy instead of crisp, or overcook, giving it a burnt taste. That’s why calibrating your thermometer isn’t just a good practice—it’s essential.
How to Calibrate Your Thermometer
Calibration sounds technical, but it’s actually quite simple. Here’s a step-by-step guide to ensure your thermometer is always accurate:
Prepare for Calibration Gather your thermometer, a pot, and some water. If your thermometer is digital, make sure it has fresh batteries.
Check the Boiling Point
Fill a pot with water and bring it to a rolling boil.
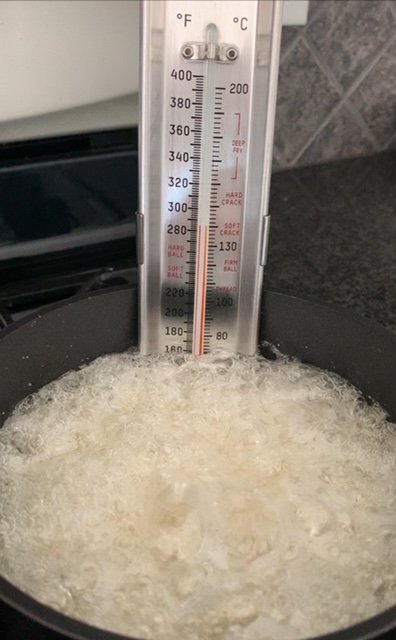
Once the water is boiling, insert your thermometer into the water, ensuring the tip does not touch the sides or bottom of the pot.
Allow the thermometer to stabilize and take a reading.
The boiling point of water is typically 212°F (100°C) at sea level. However, altitude affects this number; for every 500 feet above sea level, the boiling point drops by about 1°F. Make sure you know the correct boiling point for your location.
Adjust as Needed If the thermometer does not read the correct boiling point, note the difference and adjust your cooking temperatures accordingly. If your thermometer is reading higher, then go higher when you are using it. If it reads lower, then you go lower. For example, if your thermometer is reading 200F when inserted into boiling water, then your thermometer is reading 2 degrees lower than it should. So, if you want to get to the hard crack stage of 300F, then you would cook to 298F. Sound good?
For adjustable thermometers, then you can just correct it right away. Use the calibration nut or screw to align the needle with the correct temperature.
Ice Water Test (Optional)
Fill a glass with ice and top it with cold water. Let it sit for a few minutes to ensure the water is as cold as possible.
Insert the thermometer into the icy water without touching the sides or bottom of the glass.
The thermometer should read 32°F (0°C). If it doesn’t, adjust or note the variance.
Repeat Regularly Make it a habit to check your thermometer’s accuracy every few months or before any major candy-making project. This small effort will save you from potential mishaps.
Tip: I don’t go out of my way to calibrate my thermometer. I simply find a time when I’m already boiling water and then get my thermometer out then to check it. There are so many times when you just naturally need to boil water, that you can just throw your thermometer in before you start to make whatever it is your making, calibrate your thermometer and then move on with your life. Don’t make this a big production, it really doesn’t need to be.
Now go make some candy!
Hey, I’m Kim!
After a lot of practice (and a few sticky disasters), I’ve crafted a delicious selection of lollies and mastered a ton of candy making tips to share with you—lump free. (You’re welcome.)


